> For the complete documentation index, see [llms.txt](https://hichemtech.gitbook.io/reqease-docs/llms.txt). Markdown versions of documentation pages are available by appending `.md` to page URLs; this page is available as [Markdown](https://hichemtech.gitbook.io/reqease-docs/form-validation/validation-process.md).
# Validation process
## Overview
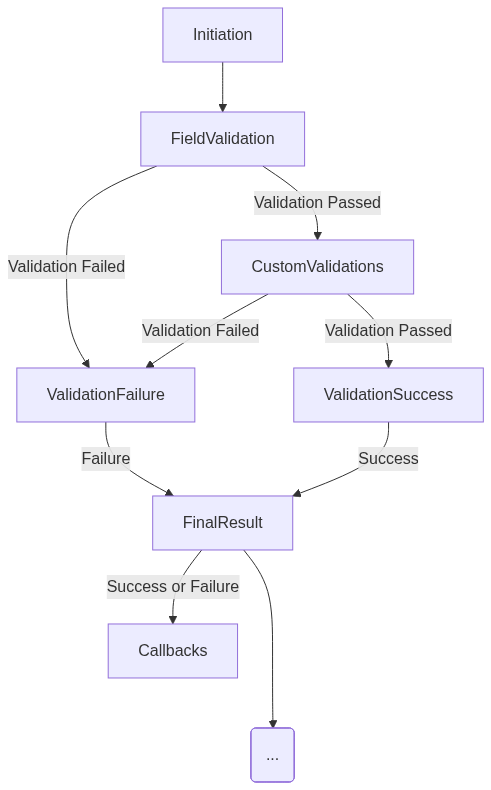
Validation process
## The Initiation Phase
The validation process kicks off when the Form Validator s triggred (by okBtn). This initiation step is crucial as it sets the stage for the subsequent validation checks.
## Field Validators Take the Stage
At the heart of the validation process are the **Field Validators**. These validators are responsible for checking the individual input fields against the defined validation rules. ReqEase Form Validator builds an array of Field Validators, each associated with a specific field and its corresponding validation rules.
* **Field Validator Object:** Each Field Validator is an object that contains two key properties:
* `field`: This property holds a reference to the HTML input element being validated. It can be an HTML element, a jQuery object, or simply the field name.
* `constraint`: The constraint object defines the validation rules for the associated field. It specifies which rules the Field Validator should apply during validation.
*
## Field Validation: Success or Failure
With the Field Validators in place, the validation process moves on to checking each input field. Here's how it unfolds:
1. **Validation Begins:** The Form Validator starts iterating through the Field Validators array, checking each input field one by one.
2. **Field Validation:** For each field, the Field Validator applies the validation rules defined in the associated constraint. If the input data adheres to all the rules, the field is considered valid.
3. **Success or Failure:** Based on the validation results, two scenarios can occur:
* **Validation Success:** If the input field passes all validation rules, the validation process continues to the next field in line.
* **Validation Failure:** If the input field fails any of the validation rules, the Field Validator marks it as invalid and may display an error message, depending on the configuration.
### Input Message Renderer
In ReqEase's Form Validator, you have the flexibility to display error messages associated with form inputs using the `inputMessageRenderer`. This object allows you to customize how error messages are built, rendered, and removed for input fields.
#### **Available Methods**
The `inputMessageRenderer` consists of the following methods:
1. **buildMessage**:
This method is responsible for constructing the error message and returning it as a jQuery element.
2. **renderMessages**:
Use this method to render error messages for input fields based on the provided data.
3. **removeMessages**:
This method allows you to remove error messages associated with input fields.
4. **affectInput**:
Use this method to apply the error message to the input field, making it visible to the user.
#### **Customization and Default**
Developers can customize the `inputMessageRenderer` by providing their own implementation of these methods. However, **if you don't specify a custom `inputMessageRenderer`, ReqEase comes with a default implementation** that handles error message rendering for input fields.
here's an example of `inputMessageRenderer` implementation:
```javascript
{
buildMessage: (_messageRenderer, _message, messageData) => {
return $("
" + messageData.message + "
");
},
renderMessages: (messageRenderer, message, messagesData) => {
let formGroup = message.targetElement.parent(".form-group") ?? message.targetElement.parent();
let messages = formGroup.find(".validator-messages-parent");
if (isUndefinedOrNull(messages) || messages.length === 0) {
let messages_tmp = $('');
messages_tmp.appendTo(formGroup);
messages = messages_tmp;
}
messageRenderer.removeMessages(messageRenderer, message);
for (let messageData of messagesData) {
let messageElement = messageRenderer.buildMessage(messageRenderer, message, messageData);
messageElement.appendTo(messages);
}
},
removeMessages: (_messageRenderer, message) => {
let formGroup = message.targetElement.parent(".form-group") ?? message.targetElement.parent();
formGroup.find('.is-invalid').removeClass('is-invalid');
formGroup.find('.is-valid').removeClass('is-valid');
formGroup.find('.validator-messages-parent .validator-message').each(function (_index, element) {
$(element).remove();
});
},
affectInput: (_messageRenderer, message, messageData) => {
let firstMessageData = messageData[0];
if (firstMessageData.status === MessageStatus.SUCCESS) {
message.targetElement.addClass('is-valid');
} else if (firstMessageData.status === MessageStatus.DANGER) {
message.targetElement.addClass('is-invalid');
}
}
}
```
With the `inputMessageRenderer`, you have the power to tailor how error messages are displayed for input fields within your forms. This flexibility ensures that you can create a user-friendly and visually appealing error message display for your web applications.
## Custom Validations Enter the Scene
After the Field Validators have examined and validated all the input fields, it's time for **Custom Validations** to shine. These are user-defined functions that can perform additional checks on the entire form or specific data.
* **Custom Validation Function:** A Custom Validation function receives a callback function as a parameter. This callback function serves as a signal for the validation process to continue or halt.
```typescript
(callback: (validationSucceed: boolean) => void) => void
```
* **Stopping the Process:** If a Custom Validation function encounters an issue and wants to prevent further validation, it can call the callback with `false`. This will signal a halt in the validation process.
* **Proceeding with Caution:** Conversely, if all is well in the Custom Validation, calling the callback with `true` allows the validation process to continue.
## The Outcome: Success or Failure
At this stage, the Form Validator has completed the comprehensive validation process. The final verdict can be one of two outcomes:
* **Validation Success:** If all input fields pass their respective validation rules, and all Custom Validations succeed, the Form Validator considers the entire form as valid.
* **Validation Failure:** If any input field fails validation, or if any Custom Validation indicates a failure, the Form Validator determines that the form validation process has failed.
---
# Agent Instructions
This documentation is published with GitBook. GitBook is the documentation platform designed so that both humans and AI agents can read, navigate, and reason over technical content effectively. Learn more at gitbook.com.
## Querying This Documentation
If you need additional information that is not directly available in this page, you can query the documentation dynamically by asking a question.
Perform an HTTP GET request on the current page URL with the `ask` query parameter:
```
GET https://hichemtech.gitbook.io/reqease-docs/form-validation/validation-process.md?ask=
```
The question should be specific, self-contained, and written in natural language.
The response will contain a direct answer to the question and relevant excerpts and sources from the documentation.
Use this mechanism when the answer is not explicitly present in the current page, you need clarification or additional context, or you want to retrieve related documentation sections.